I lost the momentum of the weekly updates as weekends away as well as Xmas parties affected the progress a bit. But on the other hand days off work helped here and there. Anyway hope you enjoy reading my progress over the last 5 weeks.
Engine oil cooler hose

 The lower engine oil cooler hose, that goes from the oil pump to the oil radiator, was very porous. Therefore a consistent oil leak, that would drip on my new suspension rubbers... not an option...
Forum friends suggested to not even ask MB for a price, just go to a hose place. So went with my old hose to Enzed here in Adelaide and they made me a new hose reusing the couplings for about $70 while I was waiting! How good is that...
I just replaced the porous one, as the other one, from the top of the radiator, to the next the oil filter housing, is impossible to get to. In hindside it would have been quite easy when the front axle carrier was off, but that's another story.
So for now, no more oil drips from this corner of the car...
Front suspension

- Upper wishbones including ball joints
- Upper and lower control arm bearings/bushings
- Lower wishbone ball joints
- Bilstein shock absorbers
- Front axle torsion bar rubber bearing, clamps & links

When fitting, especially the axle-carrier to body rubber mounts the Mercedes-benz workshop manual refers to Napthalen (000 989 04 60) to lubricate the rubbers when remounting. After some research found that this is castor oil grease, meaning it is not petroleum based, rather plant based. In the local Repco found PBR Rubber grease that is just the same thing...
To remove the control arm bushings, you need to make a tool. I'll place a photo of this later. Basically a M12 tap end, with a receiver and a number of rings and bolts, so you slowly can pull the rubber out of the control arm.
Front Axle Carrier to Body mounts
Had to use a engine hoist, to keep the engine in its place, while dropping the axle carrier. The role of the axle carrier is basically that the body rests on it, with the mounts we're replacing, then the engine also rests on this, while it is supported by the control arms and wheels.

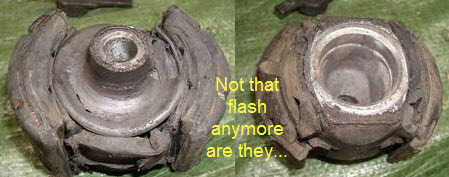
Engine mounts
 The engine mounts were incredibly dry and worn so these had to be replaced. It only made sense to also replace the engine shock/dampers. Well I'm glad I purchased the new ones, as the old ones once removed had no damping what-so-ever left in them!

 So just some wiggling teared the engine mounts in two and gave me access to the engine carrier (the arm that connects the engine to the engine mount). This was bolted to the engine with 4x12mm bolts and the impact gun did this with ease. Then the engine carrier arm, could be placed in the workmate, and then the 19mm bold came off easy...
 Mounting the new engine mounts while the axle carrier was removed was quite easy. For the engine shock/dampers I had to make a special tool. The new rubbers needed to be squeezed quite a bit for the nut to go on. There is no way in fitting the nut without this tool.
I used a cheap 100mm door hinge, removed the pin, drilled a 22mm hole for the nut and socket, and a 12mm slot to slide over the piston. I connected these with two 50mm M6 bolts and wing nuts and the rubbers could be squeezed. As you can see there is quite a bit of tension but it did the job...
Steering

 Although in the maintenance records it showed that the Power steering box was overhauled, cleaned, resealed and painted only 8 months ago, the steering was still very indirect.
Inspection showed that the rubbers on the tie rods were torn, therefore probably caused dirt to go in and grease out of the joint, creating play and a bad steering feel so these had to be replaced. While I was at it, also replaced the drag link and the Steering damper. I purchased an idler arm repair kit but did not fit at this stage as this seemed still fine.
 Front brakes & Wheel bearings
While the front hubs were removed it made sense to overhaul the front brake system. Luckily I have a mate that works at a brakes place here in Adelaide. He organised an incredible deal where I only paid trade price and no labour!!! I got the discs, pads, piston and brake hose replaced. The calipers were rebuilt including sand blasting and respraying. They look new! They also replaced the bearing cups so I could fit the hubs back with nice new bearings. All in all, a fabulous job and quite an important one.
Timing chain

 On the forums a lot of members are talking about horror stories of the timing chain. The tensioner timing chain guide can break, the chain can slip off and a lot of damage could be done inside the block. In addition to this, as the chain stretches the timing is out and a lot of horsepower is lost. So time for a check.
I removed the left valve cover to reveal a perfectly looking timing chain guide engine tensioner. So cleaned up the cover and refitted with a new gasket and some ease of mind.
Next on the list:
Remove the seats, clean the rails, vacuum the carpets underneath, fit the new sheepskin covers and remount the seats, moving the driver side to the lowest mounting holes.
Get a wheel alignment done.
Go for a careful drive, burning in the brakes and then recheck all the torque settings on the suspension parts.
Finally finish the transmission oil change
Replace the rear diff oil
Replace the fuel filter and all its hoses.